Razkal719
Razkal719 t1_je1nvtc wrote
Reply to comment by zach_dominguez in Don't let her cuteness fool you (Hungary, 1944) by Steve_Hufnagel
Eat mOrE ChikIn, OR ELSE!
Razkal719 t1_jcqgtds wrote
Reply to comment by Twebified in Creating studs on top of a concrete wall by Twebified
The "giant" drill LaoWai is recommending is a Hammer Drill. Get the appropriate sized masonry bit for the anchors you'll be using when you rent it.
Razkal719 t1_j87eath wrote
Reply to comment by DaveShadow in Frasier - how did Niles become a doctor? by soft_waves
You know what they call a lawyer who graduates at the bottom of their class?
Senator.
Razkal719 t1_j6515sf wrote
Reply to TIFU by inadvertently getting my boss fired, making life even worse and now maybe getting fired myself by [deleted]
>I’ve just been put on an improvement plan so assume they’re trying to get rid of me
Don't assume this, especially if you have 10 years with this company. Work the plan, apply yourself and show them you're willing to improve. Going forward, whether with this company or another, don't vent to your boss. Vent to your friends after work. Your boss is not your friend. It's an axiom of business that you don't bring a problem to your boss if you don't have a solution, it doesn't have to great solution and don't expect it to be implemented, but it shows that your thinking and not just complaining. Also if your lucky enough to have a good boss and good relationship with them, support them both in your work and your words. Don't mean to sound cringe, but this is a real learning opportunity.
Razkal719 t1_iy7jb7e wrote
Reply to comment by Citanaf in General Feedback/Getting Started Questions and Answers [Weekly Thread] by AutoModerator
If it was put in between 1940 and 1980 it very well may have. But it's not a concern if you don't disturb it, ie cut or demo it.
Razkal719 t1_iy7j3wo wrote
Reply to comment by bonesaw1428 in General Feedback/Getting Started Questions and Answers [Weekly Thread] by AutoModerator
Home Depot and Lowes sell premade cabinets in a few basic colors/styles. They also have cabinet units specifically for going above a washer dryer that are 60" long, 24"tall and 12" deep. Just search for Laundry Cabinet.
Razkal719 t1_iy6rh97 wrote
Reply to comment by Sure-Leg-6769 in General Feedback/Getting Started Questions and Answers [Weekly Thread] by AutoModerator
A cordless drill is not going to last long mixing mortar. It's a matter of horsepower and temperature more than torque. Torque measures how much leverage the drill can apply to a screw. Mixing is a continuous high load over a fairly long time and will burn out the winding or brushes. Although most cordless drills are brushless nowadays. If you're going to do a lot of mixing, go to harbor freight and buy a cheap 1/2" corded drill. Because even a 3/8" corded is insufficient for heavy mixing jobs.
Razkal719 t1_iy6qjcc wrote
Reply to comment by Citanaf in General Feedback/Getting Started Questions and Answers [Weekly Thread] by AutoModerator
Looks like regular drywall with a roller texture surface. Be aware, if your garage is attached to the house you likely need to use 5/8 and or fire resistant drywall on the shared wall. So this may be older style fire resistant drywall.
Razkal719 t1_iy2wvkm wrote
Reply to comment by asuhayda in General Feedback/Getting Started Questions and Answers [Weekly Thread] by AutoModerator
I'm assuming the metal frame has an angle profile with holes for screws to go into the door frame at 90 degrees to each other. So some on the face of the frame and some on the inside of the frame. I'd mount the 3/4 screen molding an 1/8 or 1/4 in from the face of the door frame so that the holes in the metal angle line up with the center of the 3/4 molding. Pre-drill your holes or the molding will split. This will leave a small gap in the inside corner but that shouldn't make the metal frame loose or unsupported provided you get good connection from both the face and inside screws. You may want to buy screws for the inside holes that are a 1/4 inch longer so you still get good grip into the wood door frame.
Razkal719 t1_ixy5by9 wrote
Reply to Faucet handle water leak by ubiken
Yep, remove the little PF cover, use either your fingernail or a pocket knife. Then loosen the set screw and pull up to remove the handle. Then there's a bonnet cap under the knob, the bottom of it actually shows under the knob in the pic. Remove this bonnet nut, which will reveal the hex retainer nut that holds the cartridge valve in. Turn off the supply valve before removing or loosening the retainer nut. It may be enough to just tighten the retainer, but more likely you'll need to replace the cartridge. Remove the retainer nut and pull up on the cartridge. Take it with you to the store to get a matching one. It'll be a price fister.
Razkal719 t1_iuihbx1 wrote
Reply to comment by tlm4594 in Can I put some type of grate where they had to put a new gas line in? by tlm4594
Where the gas line is coming up out of the little trench, put a piece of foam insulation, or wrap it with foam packing material so the concrete isn't directly touching the pipe. The pipe and the concrete will expand and contract differently through the seasons so you want a small gap to separate them.
Razkal719 t1_iugoky8 wrote
Reply to comment by rossmosh85 in Mortar for installing Schluter Ditra to concrete with vinyl flooring glue still mostly present? by Zenit_IIfx
You can use modified to put tile onto the ditra, but NOT to put the ditra onto the substrate.
Razkal719 t1_iug8wrf wrote
Reply to Mortar for installing Schluter Ditra to concrete with vinyl flooring glue still mostly present? by Zenit_IIfx
The ONLY mortar for putting down Ditra is regular unmodified thinset, A118.1 Because it has to cure purely from the chemical reaction of the cement as it will be covered by the plastic Ditra. Don't use anything with "crack preventive" or "modified" in the name.
As to your floor, as long as the glue is well and truly stuck to the concrete and doesn't have any large bumps or trowel lines you can lay the thinset and ditra on top of it. Looking at your picture, I'd go at it a bit with a bladed floor scraper, but no need to get too picky. The Ditra is an isolation membrane so it'll separate the concrete from the tile bed.
Razkal719 t1_iuc7uaw wrote
Reply to Tighten Loose Door Handle by beccasr
Remove the set screw on the shank of the handle to remove the handle. On the same side there's a setscrew on the seam of the middle and the escutcheon, then you can remove the escutcheon. That should expose the screws that go through the door and hold on the opposite handle. Tighten those screws.
Razkal719 t1_iua8wqm wrote
Reply to A dyslexic friend of mine thought it might help his condition if he joined a poetry club. by AdeptLengthiness8886
Well Ceramic does rhyme with Iambic
Razkal719 t1_itndo0d wrote
Reply to comment by Witty_Restaurant4339 in General Feedback/Getting Started Questions and Answers [Weekly Thread] by AutoModerator
As long as you don't attack the tile with a grinder it's safe. You can coat the floor with self leveling compound and then put down LVP or ceramic tile or sheet vinyl.
Razkal719 t1_itnd8vn wrote
Reply to comment by amanda_pandemonium in General Feedback/Getting Started Questions and Answers [Weekly Thread] by AutoModerator
After you've removed the tile, cut or scrape any hanging bits of paper off. Then paint the paper and any exposed areas of drywall core with PVA primer. Then you can use thinset. Although for backsplashes I prefer to use mastic, you can apply it with an 1/8" V groove trowel and avoid it pushing through the grout lines on the mosaic tiles. Also the OmniGrip brand is very sticky and so holds the individual small tiles better than thinset.
Razkal719 t1_itmxa55 wrote
Reply to comment by otaknap in Running potlights in an unfinished basement - Toronto by otaknap
Well, that's a new one to me. But you're right they are made to just clip to the drywall. Buy a couple extras because those aren't replaceable bulbs, if one goes out you'll need to replace the hole unit.
Razkal719 t1_itmfukx wrote
What LED can lights are you looking at? Usually the springs are to secure the LED into an existing can as a replacement for an incandescent bulb. The springs hold up the LED like the baffle trim is secured in a standard can light. I've not seen ones designed to secure directly to drywall, that doesn't sound UL or IEEE approved at all.
Razkal719 t1_it0nmd0 wrote
Reply to comment by ST3AM3D_HAMS in General Feedback/Getting Started Questions and Answers [Weekly Thread] by AutoModerator
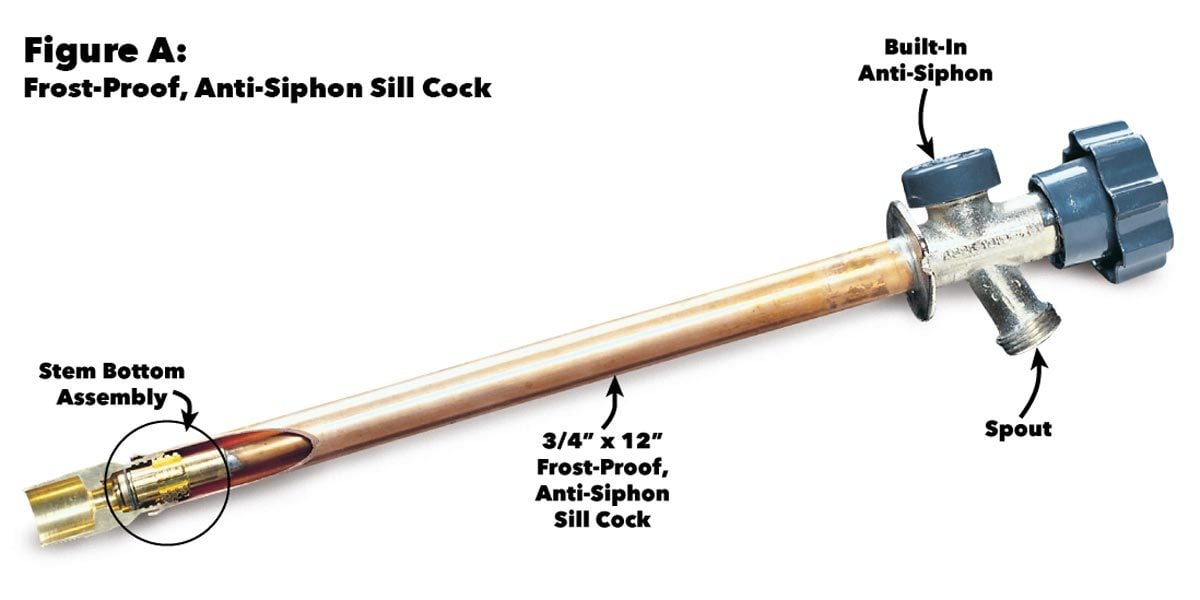
Can you post a picture? This is what a frost proof sill cock looks like.
Note that the handle is in a straight line with the shaft of the unit. There is a straight rod from the handle to the valve at the back. If your handle is at an angle then it's likely not a frost proof.
Razkal719 t1_iszcobq wrote
Reply to NASA’s Lucy swings by the Earth for the first of three times, just skimming the atmosphere to steal momentum on her way to Jupiter by tectonic
Did they ever get the second solar array fully unfurled?
Razkal719 t1_isvnhz0 wrote
Reply to comment by ST3AM3D_HAMS in General Feedback/Getting Started Questions and Answers [Weekly Thread] by AutoModerator
Are they faucets or just sillcocks or spigots? Are they made to connect to a hose or is there actually a faucet and sink with separate hot and cold and a drain?
A standard sillcock, spigot or hosebib is generally a "freeze proof" which means it extends into the house usually 12 to 20 inches and closes the water flow there. This prevents frozen pipes and valves. Be sure to disconnect any hoses so the spigot can drain, newer modes will have an air break. You can also get a removable styrofoam cover to insulate them from the outside cold.
Razkal719 t1_isvl6kp wrote
Reply to comment by Difficult_Arm_5609 in General Feedback/Getting Started Questions and Answers [Weekly Thread] by AutoModerator
As SwingNinja said an oscillating tool is good, but if the wood is oak it may struggle to make the cut. It'll cut through pine easily enough, but for hard wood a circular saw will cut straighter. Although you'll want to stop short of the end of the cabinet and finish the cut with a hand saw or skill/saber saw. If your in a tight location because of the counter, you may want a compact circular saw like a Rockwell Versacut.
Razkal719 t1_islz2mo wrote
Reply to comment by glitterybugs in General Feedback/Getting Started Questions and Answers [Weekly Thread] by AutoModerator
In a previous millennium I'd say your local library, but today just go to YouTube. Search for removing wallpaper. If it's a big room I recommend renting a steamer for small jobs the spray works ok. Then search for vids on painting, but not Bob Ross vids.
Razkal719 t1_je58jo8 wrote
Reply to concrete shower pan with corner bench -- but forgot to build bench. what to do? by jaaassshhh
Maybe one of these?
https://www.tools4flooring.com/better-bench-bb-24-24-triangular-shower-bench.html?utm_source=bing&utm_medium=cpc&utm_campaign=**LP%20-%20Shop%20-%20Shower%20-%20Benches%20%26%20Shelves&utm_term=4576992030631797&utm_content=854%20%7C%20Better%20Bench%20BB-24%2024%22%20Triangular%20Shower%20Bench%20%7C%20%2440.69